Parallax Backgrounds for Unreal Engine
Product overview
Unreal project featuring a side scroller setup with Parallax effect Backgrounds.
Content
-1 Character Blueprint
-1 Parallax Background Blueprint
-1 Game Instance
-1 Widget
-21 Materials (5x 4 Layers + 1 transparent)
-35 Texture files
-1 Test Level
Features
-Parallax effect with 3 layers + floor
-Combine the layers manually or randomly to create new environments
-Add new backgrounds easily
-5 Example Textures for every layer (including floor). Classic movie hand-painted backdrop style.
Starting the project
Open The “Epic Games Launcher”, go to the “Unreal Engine” section, and then click on “Library”.
Scrolling down your library you will find your “Vault” at the bottom. There is where your purchased content will be available.
Click here for more details about how to find your purchased content for Unreal Engine
Applications
-Side scroller games, specially platforms, beat ‘em ups or endless runners. Perfect for retro style games.
-Inspire yourself with random background combinations to design new scenes for your games
Migrating Content to another Project
Make sure both projects are made with the same version when migrating content between them.
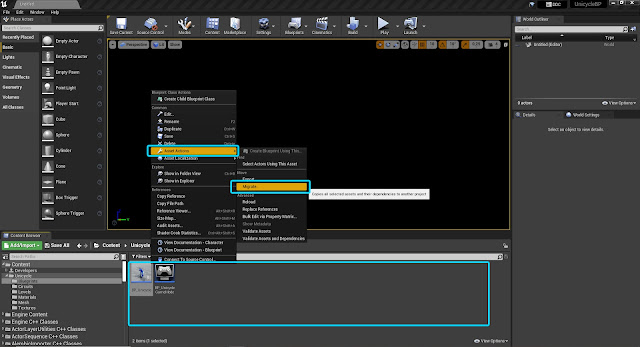
Right click on the assets you want to migrate, and it will appear a Menu.
Click on “Asset Actions” and then on “Migrate” and follow the instructions.
Click here to learn more aboutmigrating content from one project to another.
Make sure to copy the needed Blueprint content and variables also inside your character BP if you don’t want to use the one included.
And don’t forget to Edit the Input and add the Action Mappings and Axis Mappings so the keys and buttons respond correctly.
The Parallax Backgrounds Project
Default Controls:
|
Basic Controls |
Keyboard and Mouse |
|
Left |
A |
|
Right |
D |
|
Change Background Layer 1 |
1 |
|
Change Background Layer 2 |
2 |
|
Change Background Layer 3 |
3 |
|
Change Floor |
4 |
|
Random Background |
5 |
|
Jump |
Space |
Key mappings can be edited by Clicking on “Edit” from the “File Menu”, then on “Project Settings”, and, at the new window which will open, finding “Input” on the list of settings at the left.
Blueprints
The Blueprints are ordered in named sections to easily find the one you want to adjust.
Adding New Backgrounds
To add new backgrounds just duplicate one of the materials and replace the “Texture Sample” nodes with your images. To add transparent parts you need a version of the image where the opaque parts are white and the transparent parts are black as you can see at the examples included.
Then open BP_GameInstance (in the Blueprints folder), select the variable for the layer where you want to add a new material, add a new Array Element and select your new material. That way it will be detected by the background blueprint.
To create that classic movie hand painted backdrop effect from photos I used Photoshop, this is the process roughly:
Adjustments>Shadow/Highlights: Shadows amount 50 to 30, Highlights amount 0.
Filter>Noise>Reduce Noise: Intensity 4 or 3, the rest of values 0.
Filter>Filter Gallery>Film Grain: Grain 0, Area 0 and Intensity about 4.
Thank you for buying, I hope you like the product and that it gives you good results.
I would be glad to know what projects you develop with it.
©apcgraficos


Comments
Post a Comment